How do devices successfully transfer big chunks of different data over the network connection?
In the client–server model of application architecture, multiple simultaneous communication sessions may be initiated for the same service. Usually, few services or applications run at the same time. Therefore, multitasking and high transfer rates are provided to us. How do computers manage this? The network ports are the key factor here.
What is a network port?
A network port is a virtual point where network connections start and end. Ports are software-based and managed by a computer's OS. Each port is associated with a specific process or service. Ports allow computers to easily differentiate between various kinds of traffic: emails go to a different port than webpages, despite the fact both reach a computer over the same Internet connection. Ports are standardized across all network-connected devices, with each port assigned a number.
What is a port number?
A port number is a 16-bit integer (ranging from 1 to 65535) that helps devices identify a specific service or application to which an Internet or other network message should be forwarded when it arrives at a server. They are assigned automatically by the OS, manually by the user, or set as a default for some popular applications. Port numbers are mainly used in TCP and UDP-based networks and are always associated with the IP address of a host:
There are 65,535 possible port numbers, although not all of them are commonly used. Below is a list of some of the most frequently used ports along with their associated networking protocols:
- Ports 20 and 21 — File Transfer Protocol (FTP). FTP is used for transferring files between a client and a server.
- Port 22 — Secure Shell (SSH). SSH is one of many tunneling protocols that create secure network connections.
- Port 25 — Simple Mail Transfer Protocol (SMTP). SMTP is used for sending email.
- Port 53 — Domain Name System (DNS). DNS is an essential process for the modern Internet; it matches human-readable domain names to machine-readable IP addresses, enabling users to access websites and applications without memorizing a long list of IP addresses.
- Port 80 — Hypertext Transfer Protocol (HTTP). HTTP is the protocol that makes the World Wide Web possible.
- Port 123 — Network Time Protocol (NTP). NTP allows computer clocks to synchronize with each other, a process that is essential for encryption.
- Port 179 — Border Gateway Protocol (BGP). BGP is essential for establishing efficient routes between the large networks that make up the Internet (these large networks are called autonomous systems). Autonomous systems use BGP to broadcast which IP addresses they control.
- Port 443 — HTTP Secure (HTTPS). HTTPS is the secure and encrypted version of HTTP. All HTTPS web traffic is directed to port 443. Network services that use HTTPS for encryption, such as DNS over HTTPS, also connect through this port.
- Port 500 — Internet Security Association and Key Management Protocol (ISAKMP). This protocol is part of the process of setting up secure IPsec connections.
- Port 3389 — Remote Desktop Protocol (RDP). RDP enables users to remotely connect to their desktop computers from another device.
The Internet Assigned Numbers Authority (IANA) maintains a comprehensive list of port numbers and their assigned protocols.

Are open network ports serve for the good, though?
Well... Mostly, they do. However, open ports can pose a danger if the service listening on the port is misconfigured, unpatched, vulnerable to exploits, or has weak network security rules. Of particular concern are "wormable" ports, which are open by default on some operating systems. For instance, the SMB protocol was exploited by a zero-day vulnerability known as EternalBlue, which led to the WannaCry ransomware worm. This means that attackers utilize open ports to identify potential vulnerabilities and actively search for publicly accessible ports through port scanning. Read more about the open ports vulnerability.
Port scanning, what does it stand for?
Port scanning is a process in which a specialized tool known as a port scanner sends client requests to a range of server port addresses on a host to identify open or active ports and any vulnerabilities in the received data. In most cases, port scanning is not used for attacking or hacking; rather, it is employed to identify the services available on a remote machine.
A port scanner is an application designed to probe a server or host for open ports. Such an application may be used by administrators to verify the security policies of their networks, as well as by cyberattackers to identify network services running on a host and exploit vulnerabilities. Port sweeping is the process of scanning multiple hosts for a specific listening port. It is typically used to search for a particular service on a certain port. For example, an SQL-based computer worm may look for hosts listening on TCP port 1433.
Why am I reading about cyberattacks and open port vulnerabilities here?
Roxy-WI is capable of identifying security risks through port scanning and, as a result, can help prevent potential network attacks.
Since version 4.5.3, Roxy-WI offers the ability to scan a remote system for open ports. Scanning is performed on demand rather than on a regular basis. Due to this irregular frequency, it is impossible to track changes and ensure that all unnecessary ports are closed.
Since version 5.1.0, Roxy-WI includes a service that tracks all open ports, compares them, maintains a history, and notifies you of any changes. You now have up-to-date information about the network status of your servers.
Port Scanner 2 is an independent long-running worker. Roxy-WI sends desired assignments through RabbitMQ; the worker performs the scans and publishes complete snapshots and heartbeats back to Roxy-WI. The worker does not import Roxy-WI code and does not write to the Roxy-WI database, so it can run on the Roxy-WI host, a dedicated server, Docker Compose or Kubernetes.
Port Scanner 2 uses an unprivileged TCP connect scan (nmap -sT). It does not require root, raw-socket capabilities or
privileged Kubernetes containers. Targets and scan controls are validated before nmap is started, and the worker never
builds a shell command from an address supplied by a user.
- Roxy-WI converts every enabled server into a durable
portscanner.assignment.applycommand. - A worker claims the assignment, scans the target on the configured interval and renews its lease while it owns the work.
- The worker atomically saves its previous-scan baseline and an outgoing
portscanner.scan.completedevent. Schema version 2 contains the current snapshot and explicitopened/closedchanges. - Roxy-WI saves each unseen change in enabled history, even when events arrive out of order. Only a newer event updates the current open-port table; repeated deliveries do not create duplicate history or notification jobs.
An unreachable target or failed scan does not replace the last successful snapshot with an empty list. The failure appears in the
worker heartbeat and the worker is shown as degraded until a later scan succeeds. Disabling an assignment cancels an active scan.
The scan interval comes from port_scan_interval in the Roxy-WI group settings.
Install the package on the Roxy-WI host or on a standalone worker host:
# EL/RHEL-compatible systemssudo dnf install roxy-wi-portscanner# Debian/Ubuntusudo apt updatesudo apt install roxy-wi-portscanner
The package does not depend on the Roxy-WI package. It installs nmap, creates the unprivileged
roxy-wi-portscanner account and installs roxy-wi-portscanner.service. On a Roxy-WI host, the default
auto mode reads the RabbitMQ connection configured in Roxy-WI.
On a worker-only host, edit /etc/roxy-wi/portscanner.env before starting the unit:
PORTSCANNER_USE_ROXYWI_RABBITMQ_SETTINGS=0PORTSCANNER_RABBITMQ_HOST=rabbitmq.internalPORTSCANNER_RABBITMQ_PORT=5672PORTSCANNER_RABBITMQ_VHOST=/roxy-wiPORTSCANNER_RABBITMQ_USER=roxy-wiPORTSCANNER_RABBITMQ_PASSWORD=GENERATED_STRONG_PASSWORDPORTSCANNER_RABBITMQ_QUEUE_TYPE=classicPORTSCANNER_DATABASE_URL=sqlite:////var/lib/roxy-wi/portscanner/portscanner-state.db
sudo systemctl enable --now roxy-wi-portscannersudo systemctl status roxy-wi-portscannersudo tail -f /var/log/roxy-wi/portscanner.logsudo journalctl -u roxy-wi-portscanner -f -o catpython3 /usr/lib/roxy-wi-portscanner/package_portscanner.py --version
Each Port Scanner runtime log entry is a JSON object. Containers write the same newline-delimited JSON to stdout; use docker logs -f roxy-wi-portscanner | jq for a formatted view.
The version command must report 2.0.0. Read the general
distributed-services installation guide
for repository and Roxy-WI scheduler setup.
Run the published image with explicit RabbitMQ settings and persistent worker state:
docker run -d --name roxy-wi-portscanner --restart unless-stopped --stop-timeout 45 \--env-file /etc/roxy-wi/portscanner.env \--mount source=roxy-wi-portscanner-data,target=/var/lib/roxy-wi/portscanner \ghcr.io/roxy-wi/roxy-wi-portscanner:2.0.0
Containers do not read the Roxy-WI database. Provide PORTSCANNER_RABBITMQ_* directly and make the target addresses
reachable from the container network. The image runs as a non-root user and requires no additional Linux capabilities.
For Kubernetes, store the RabbitMQ password and database URL in a Secret and use a Deployment with a graceful termination period.
One worker may use its persistent SQLite database. Two or more replicas must share one Port-Scanner-owned MySQL/MariaDB schema through
PORTSCANNER_DATABASE_URL; do not use the Roxy-WI application schema. Replicas share the durable command queue and use leases,
so an assignment is taken over after the previous owner's lease expires. Commands, receipts, the previous-scan baseline and unpublished scan events survive a restart.
Use classic queues with one RabbitMQ node or quorum queues with an operated RabbitMQ cluster. Set the same queue
type in Roxy-WI and every Port Scanner replica before the queues are created.
Roxy-WI 9.1.0 protocol change: the event consumer accepts only Port Scanner event schema version 2. For an existing distributed installation using schema version 1, pause scan assignments and let the old worker outbox and RabbitMQ event queue drain through the old consumer before upgrading. Back up the Roxy-WI and Port Scanner databases, stop the affected Roxy-WI processes and workers, apply database migrations, then start the matching new versions and re-enable assignments. Do not purge pending messages: old-format events reaching the new consumer are rejected to the dead-letter queue. The package version and the event schema version are separate identifiers.
- Update Roxy-WI first and verify that
roxy-wi-schedulerandroxy-wi-service-eventsare running. - Configure RabbitMQ and make the scanned server addresses reachable from the worker host.
- Upgrade
roxy-wi-portscanner. The package removes the legacy Roxy-WI-coupled script and starts the v2 worker. - Open Monitoring => Port scanner, save the required assignments and confirm version
2.0.0on Admin area => Tools.
Package-managed installations may still be updated with the package manager or Admin area => Update. For Docker and Kubernetes, change the pinned image tag and perform a rollout; Roxy-WI does not replace remote images. See the complete migration guide.
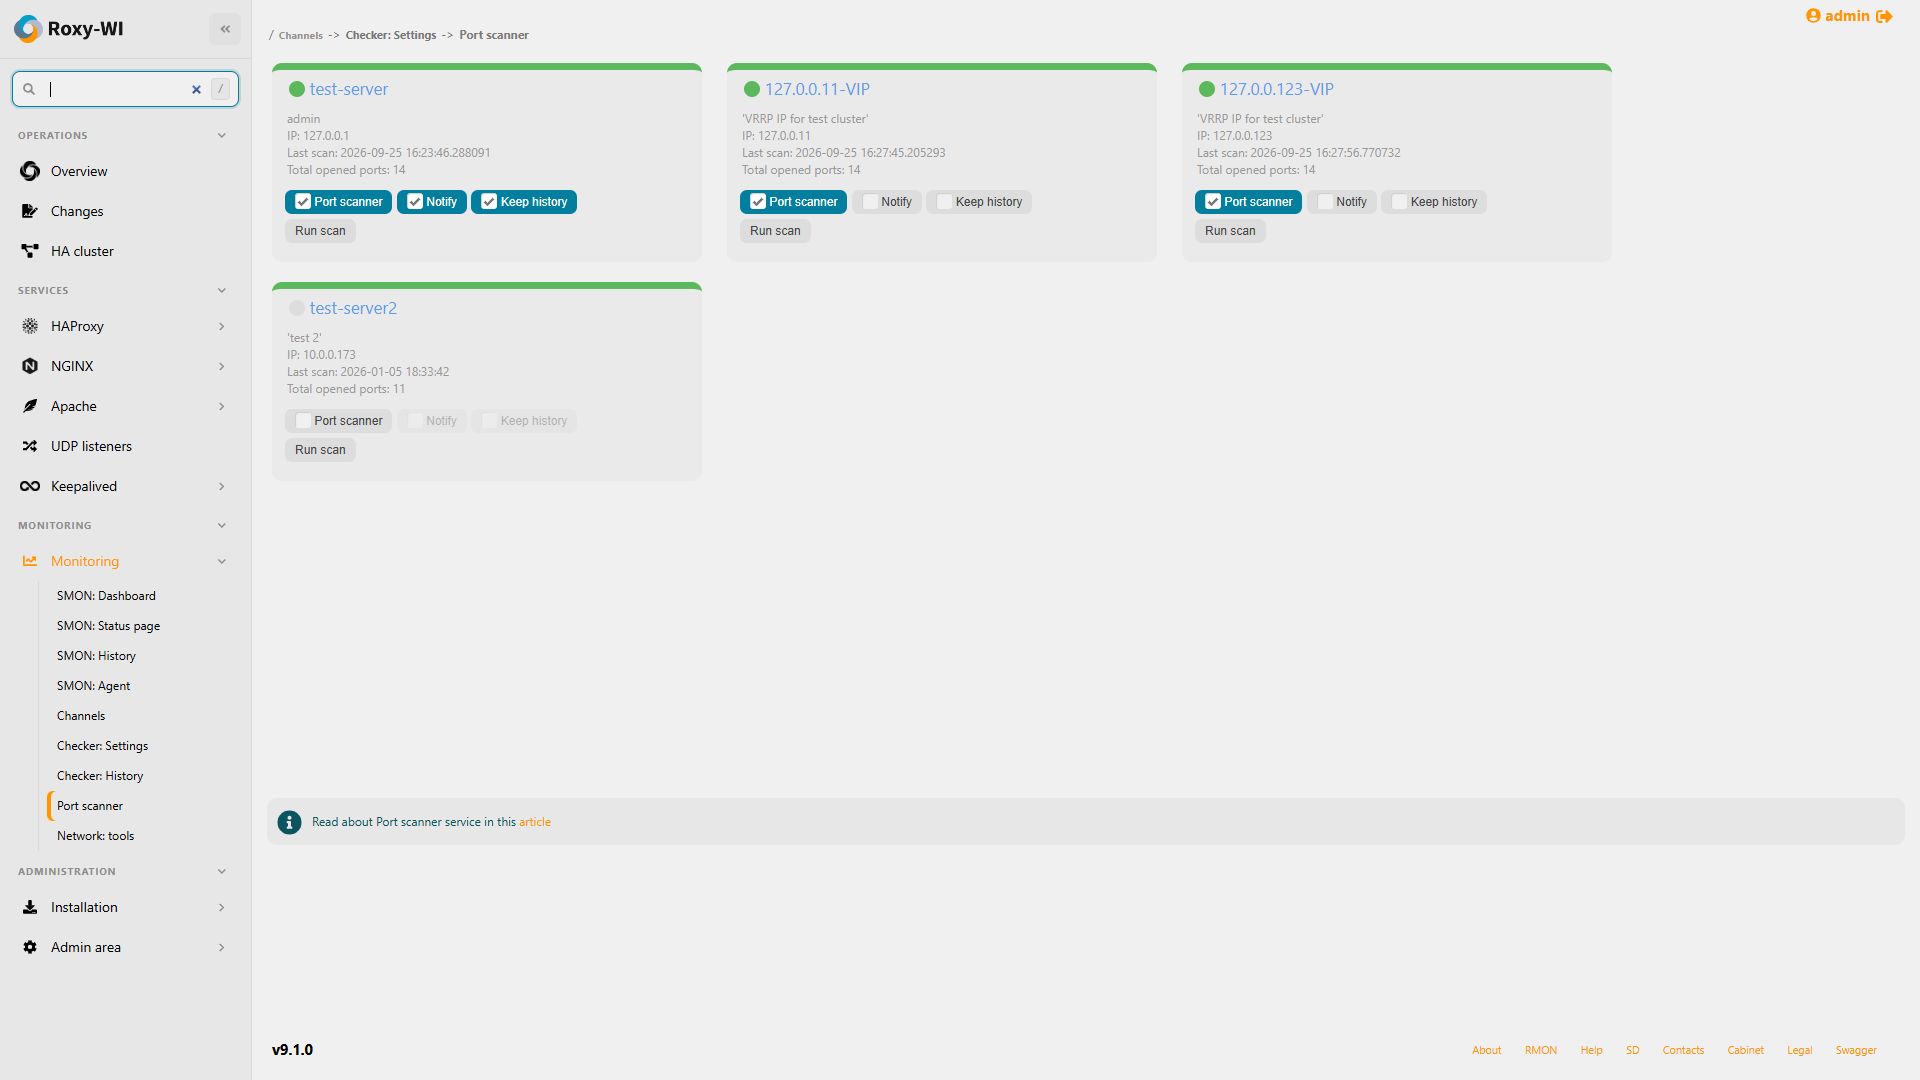
The Port scanner can send you notifications via Roxy-WI when the state of a port on the selected server changes from open to closed or vice versa. To enable this feature, select Monitoring => Port scanner in the main menu and check the Notify checkbox:
You can also enable the history for the Port scanner by checking the Keep history checkbox. This may be helpful for future debugging.
History is ordered by scan observation time and retained according to portscanner_keep_history_range.
Late events within the retained history are accepted without rolling the current ports back. Once data has been purged,
older replayed messages do not restore it; extending the retention period does not recover already deleted history.
Pending notifications are retained independently until delivery succeeds or they are cancelled.
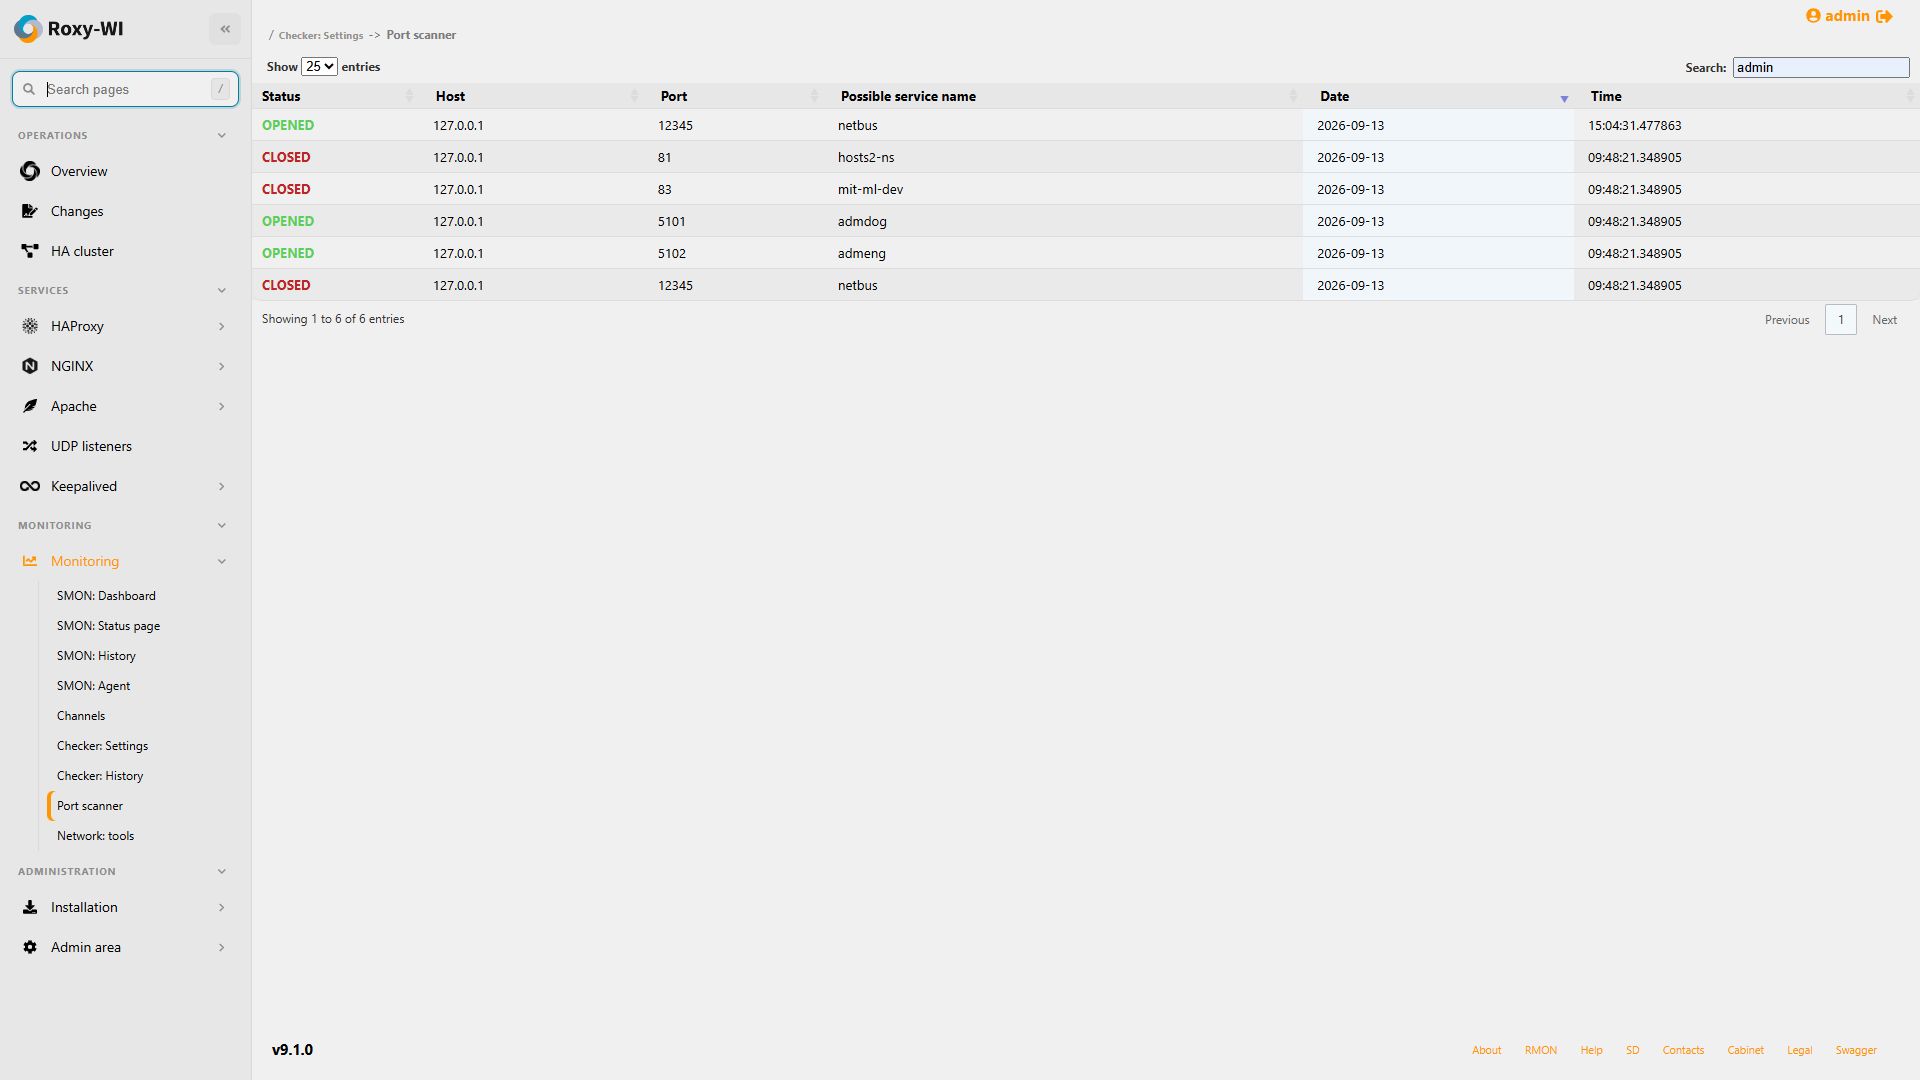
To view the Port scanner history, click on the name of the desired server, and you will be redirected to the Port scanner history tab: